
Transforming a one-bedroom apartment into a luxury retreat doesn’t require a gut renovation or a six-figure budget. It demands strategic upgrades, attention to materials, and a clear-eyed understanding of what separates high-end finishes from builder-grade basics. Whether renting or owning, homeowners can elevate a compact space with thoughtful choices in fixtures, surfaces, and layout tweaks. This guide walks through the upgrades that deliver real impact, from kitchen countertops to bathroom hardware, while keeping projects practical for DIY enthusiasts and those working with contractors alike.
Table of Contents
ToggleKey Takeaways
- A luxury 1 bedroom apartment is defined by premium materials, precise finishes, and thoughtful layout rather than square footage alone.
- Kitchen upgrades like quartz or natural stone countertops, large-format tile backsplashes, and high-end stainless steel appliances anchor luxury apartments on any budget.
- Spa-quality bathrooms require waterproof membranes, large-format porcelain tile, thermostatic valves, and heated floors to deliver genuine high-end appeal.
- Strategic lighting layers—recessed LEDs, pendant fixtures, and dimmers—combined with built-in storage transforms compact spaces into visually sophisticated retreats.
- Premium materials like engineered hardwood flooring, soft-close cabinetry hardware, and proper trim work (baseboards at 5¼ inches, crown molding) separate luxury finishes from builder-grade basics.
- Prioritize high-traffic areas, professional details like coped crown molding joints and sealed grout, and proper permits for gas lines and electrical work to avoid costly mistakes.
What Defines a Luxury 1 Bedroom Apartment?
Luxury isn’t just square footage. It’s the quality of materials, precision in installation, and how every element works together. In a one-bedroom, where space is limited, each choice carries more weight.
Premium Materials and Finishes
Luxury starts with what you touch and see daily. Engineered hardwood or natural stone flooring replaces laminate or vinyl plank. Expect quartz or natural stone countertops (granite, marble, quartzite) instead of laminate. Cabinetry should feature solid wood doors with soft-close hinges, not particleboard with plastic veneers.
Hardware matters, too. Brushed nickel, matte black, or unlacquered brass fixtures (door handles, cabinet pulls, faucets) signal quality. Skip polished chrome unless it’s high-grade solid brass underneath: cheap chrome plate wears through fast.
Trim and millwork separate luxury from standard builds. Baseboards at least 5¼ inches tall, casing around doors at 3½ inches or wider, and crown molding (even simple profiles) add architectural weight. Use primed MDF or finger-jointed pine for painted trim: save solid poplar or maple if staining.
Smart Layout and Space Optimization
In a one-bedroom, layout efficiency is non-negotiable. Open-concept designs that merge kitchen and living areas create visual flow, remove non-load-bearing walls only after consulting a structural engineer or contractor familiar with local codes. Most jurisdictions require permits for wall removal, even in apartments (check with building management first).
Built-in storage maximizes space without clutter. Floor-to-ceiling shelving, recessed cabinetry, and custom closets use every vertical inch. If installing shelving, find studs (typically 16 inches on center in modern builds) and use #8 wood screws at least 2½ inches long into studs for heavy loads.
Lighting layers matter. Combine recessed LED cans (4-inch for general lighting, 6-inch for high ceilings), pendant fixtures over islands or dining zones, and under-cabinet LED strips in kitchens. Dimmer switches (use LED-compatible dimmers to avoid flickering) let occupants adjust ambiance, critical in multi-use spaces.
High-End Kitchen Upgrades for One-Bedroom Luxury
Kitchens anchor luxury apartments, even small ones. Focus on surfaces, appliances, and smart details.
Start with countertops. Quartz (Caesarstone, Cambria, Silestone) runs $60–$120 per square foot installed depending on region and edge profile. It’s non-porous, low-maintenance, and comes in patterns mimicking marble or concrete. Natural marble ($75–$200+ per square foot) looks stunning but requires sealing and careful maintenance, spilled wine or lemon juice etches the surface.
For backsplashes, subway tile remains classic, but larger-format porcelain slabs (12×24 inches or bigger) reduce grout lines and feel more upscale. Use ⅛-inch spacers for tight grout joints with rectified tile. White-modified thinset and unsanded grout (for joints under ⅛ inch) or sanded grout (for wider joints) keep things clean. Seal grout with a penetrating sealer after 72 hours of curing.
Cabinet upgrades can be cosmetic or full replacements. If existing boxes are solid, reface with new doors and drawer fronts in shaker or slab styles. Add soft-close hinges (Blum or Grass brands are reliable). For new cabinets, look for ¾-inch plywood box construction with dovetail or doweled joints, avoid stapled particleboard.
Appliances define luxury kitchens. Stainless steel panel-ready dishwashers (Bosch 800 series, KitchenAid) hide controls on the top edge for a seamless look. Gas ranges with sealed burners or induction cooktops (faster, safer, easier to clean) beat standard electric coils. If upgrading to gas, check local codes, many jurisdictions require licensed plumbers to run gas lines and obtain permits.
Install a low-profile range hood rated for your cooktop’s BTU output. For islands, consider a downdraft vent (pop-up style) to avoid blocking sightlines. Ducted vents outperform recirculating models: route ductwork to an exterior wall with rigid metal ducting (not flexible aluminum), minimizing bends.
Finish with under-cabinet LED lighting. Puck lights create hot spots: linear LED strips (2700K–3000K color temperature) provide even task lighting. Hardwire them to a wall switch or use plug-in versions with a remote dimmer.
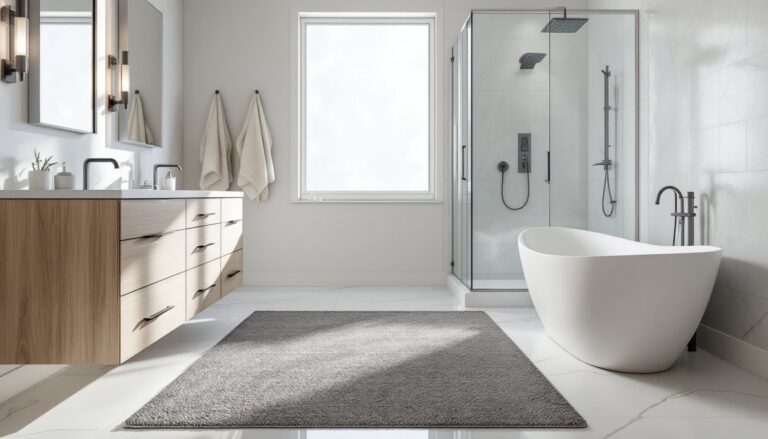
Creating a Spa-Like Bathroom Experience
Bathrooms in one-bedroom apartments are often tight, but luxury comes from fixtures, surfaces, and thoughtful details.
Replace builder-grade vanities with wall-mounted or freestanding models featuring solid wood or high-grade plywood construction. Undermount sinks in porcelain or vitreous china look cleaner than drop-in models. Pair with single-handle or widespread faucets in brushed nickel or matte black, brands like Kohler, Delta, and Moen offer solid mid-range options.
Upgrade shower fixtures to a thermostatic valve (maintains consistent temperature) or pressure-balance valve (required by code in most jurisdictions to prevent scalding). Add a rainfall showerhead (8–12 inches diameter) and a separate handheld sprayer on a slide bar. If replumbing, this is permit territory, most codes require licensed plumbers for fixture relocations or valve swaps.
Tile selection transforms bathrooms. Large-format porcelain tile (12×24 inches or larger) on floors minimizes grout lines: use porcelain or natural stone mosaics for shower floors (smaller tiles = more grout joints = better traction). For walls, subway tile works, but consider stacked bond layouts instead of traditional brick patterns for a modern edge.
Waterproofing is non-negotiable in showers. Use a waterproof membrane (Schluter Kerdi, RedGard liquid membrane, or similar) over cement board or foam board before tiling. Skipping this step invites mold and structural damage. Allow membranes to cure per manufacturer specs (usually 24–48 hours) before tiling.
Heated floors add serious luxury. Electric radiant mats (120V or 240V) install under tile with modified thinset. They’re easier to retrofit than hydronic systems and cost $10–$20 per square foot in materials. Wire to a programmable thermostat: most require a dedicated 15- or 20-amp circuit, hire an electrician if unfamiliar with NEC (National Electrical Code) requirements.
Finish with a frameless glass shower enclosure (⅜-inch or ½-inch tempered glass). These run $800–$2,500 installed depending on size and hardware finish. Measure carefully: most enclosures are custom-fabricated and non-returnable.
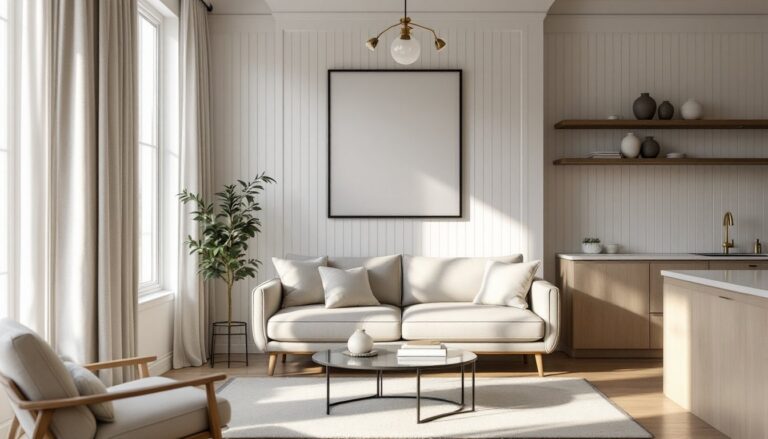
Luxury Living Room Design Strategies
Living rooms in luxury one-bedrooms balance comfort, style, and function. Materials and built-ins make the difference.
Flooring sets the tone. Engineered hardwood (3/4-inch thick with a 3–6mm wear layer) handles moisture better than solid hardwood and installs over concrete slabs common in apartments. White oak, walnut, or European oak in matte or satin finishes feel high-end. Expect $6–$12 per square foot for materials: installation adds another $3–$8 per square foot depending on complexity.
If keeping existing flooring, area rugs define zones. Wool or wool-blend rugs (not synthetic) age better and feel luxurious underfoot. Size matters, 8×10 feet minimum for living areas: all furniture front legs should sit on the rug.
Built-in shelving or entertainment centers maximize space and add custom appeal. Use ¾-inch plywood for shelves spanning more than 30 inches to prevent sagging: reinforce with 1×2 hardwood edge banding for a finished look. Anchor units to studs with 3-inch construction screws: toggle bolts work for drywall-only sections but have lower weight ratings.
Lighting layers create ambiance. Install dimmable recessed LEDs (4-inch or 6-inch) for general illumination, space them 4–6 feet apart depending on ceiling height. Add floor lamps or table lamps with fabric or linen shades for task lighting. If installing new electrical, permit requirements vary: simple lamp swaps don’t need permits, but adding new circuits or recessed cans typically do.
Many designers recommend creating visual interest with accent walls, shiplap, board-and-batten, or textured wallpaper work in living rooms. Shiplap installs horizontally with nickel-gap spacing (a nickel’s thickness, about 1/16 inch) between boards. Use 1×6 or 1×8 pine boards (actual dimensions: ¾×5½ inches or ¾×7¼ inches) and nail to studs with 18-gauge brad nails. Paint with a satin or eggshell finish for easier cleaning.
Crown molding adds architectural elegance. A simple 3½-inch or 4½-inch profile works in apartments with 8- or 9-foot ceilings. Cut inside corners with coped joints (not miters) for tighter fits that won’t gap as lumber shifts. Use a coping saw or oscillating multi-tool: miter saws handle outside corners. Prime and caulk seams with paintable acrylic latex caulk before final coats.
Bedroom Upgrades That Add Five-Star Hotel Vibes
Bedrooms in luxury apartments prioritize calm, quality materials, and smart lighting.
Start with wall treatments. Paint in muted tones (soft grays, warm whites, muted blues) creates serenity. Use premium paints (Benjamin Moore Aura, Sherwin-Williams Emerald) with low or zero VOC for better coverage and durability, typically 350–400 square feet per gallon. Two coats over primed drywall is standard.
For texture, consider grasscloth wallpaper or subtle patterns. Wallpaper installation requires clean, smooth walls: fill nail holes and sand patches flush. Use premixed wallpaper adhesive (Roman Pro-543 or similar) and a 4-inch smoothing brush or plastic smoother to eliminate bubbles. Let adhesive dry 24 hours before painting trim.
Closet upgrades transform functionality. Remove wire shelving and install custom closet systems (ClosetMaid, Rubbermaid, or DIY with melamine panels). Use ¾-inch melamine-coated particleboard for shelves and uprights: it’s affordable, paintable, and resists moisture better than raw particleboard. Secure uprights to studs with 2½-inch screws: use shelf pins in adjustable standards for flexibility.
Lighting makes or breaks bedroom ambiance. Install wall-mounted reading sconces on either side of the bed (12–18 inches from the mattress edge, 60 inches above the floor). Hardwiring requires an electrician in most cases, but plug-in sconces with decorative cords work for renters. Add a dimmer switch for overhead fixtures, Lutron Diva or Caseta models (smart-home compatible) offer smooth LED dimming.
Window treatments control light and add luxury. Blackout roller shades layered with linen or velvet drape panels create depth. Mount curtain rods 4–6 inches above the window frame and extend them 3–6 inches beyond each side to maximize light when open. Use drywall anchors rated for 20+ pounds if studs aren’t available at mounting points.
Finally, consider accent lighting. LED strip lights behind headboards or under floating nightstands add subtle glow. Use 3000K warm white LEDs for bedroom zones: cooler temps feel clinical. Power with plug-in transformers or hardwire to a wall switch if comfortable working with low-voltage wiring (always turn off breakers and test with a voltage tester before touching wires).
Upgrading a one-bedroom to luxury standards is a series of deliberate choices, materials over shortcuts, precision over speed, and quality fixtures over the cheapest option. Tackle projects in phases, prioritize the spaces used daily, and don’t skip the unsexy stuff like waterproofing or proper fasteners. The result feels curated, not cobbled together, and that’s what separates luxury from just “nice.”