
A luxury guest bathroom does more than provide a place for visitors to freshen up, it sets the tone for their entire stay. It’s the difference between a polite overnight visit and an experience they’ll remember and want to repeat. Whether you’re planning a full remodel or strategic upgrades, understanding what separates a standard guest bath from a truly luxurious one will help you prioritize where to invest time and budget. The good news? Many high-impact changes don’t require gutting the room or hiring a contractor. This guide walks through the design elements, materials, and strategic touches that deliver a five-star experience without necessarily requiring a five-star budget.
Table of Contents
ToggleKey Takeaways
- A luxury guest bathroom prioritizes intentional design, quality materials, and flawless function over expensive fixtures alone, creating a hotel-like experience that guests will remember and want to repeat.
- High-end fixtures like widespread faucets, thermostatic valves, comfort-height toilets, and consistent hardware finishes dramatically improve both the visual appeal and usability of a luxury guest bathroom.
- Premium materials such as large-format porcelain tile, non-porous quartz countertops, and solid wood vanities age gracefully and resist moisture damage far better than builder-grade alternatives.
- Spa-like amenities including radiant floor heating, quiet ventilation, premium 600+ thread-count towels, and adequate storage for guest toiletries transform a standard bathroom into a five-star retreat.
- Budget-friendly upgrades like fresh paint, faucet and hardware swaps, improved lighting, and strategic caulking or re-grouting deliver significant luxury results without requiring a full renovation.
What Defines a Luxury Guest Bathroom?
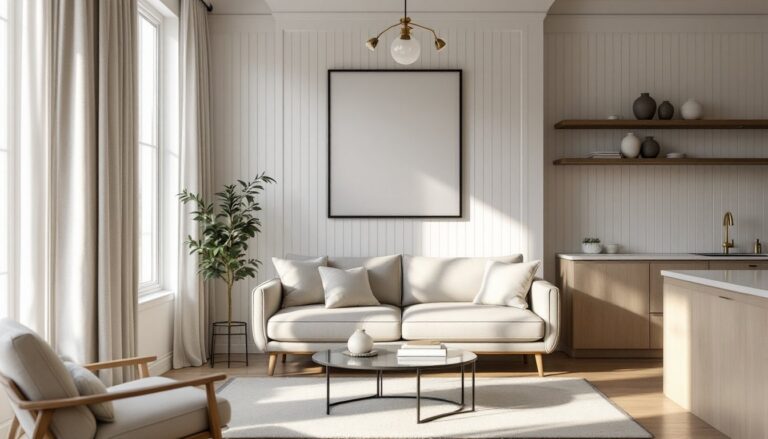
Luxury in a guest bathroom isn’t about cramming in expensive fixtures, it’s about creating a space that feels intentional, complete, and comfortable. Unlike a family bathroom cluttered with daily-use items, a luxury guest bath maintains a hotel-like clarity.
Key characteristics include dedicated storage that keeps toiletries out of sight, consistent material quality throughout (no builder-grade plastic anywhere), and thoughtful extras that anticipate guest needs. Think fresh towels that aren’t threadbare, adequate counter space for a toiletry bag, and lighting that works for both makeup application and a relaxing soak.
The space should also feel temperature-controlled and well-ventilated. A bathroom that’s drafty, humid, or poorly lit immediately undermines any upscale finishes. If your guest bath shares a wall with a noisy bedroom or kitchen, consider adding sound-dampening insulation during any wall work, it’s a small upgrade that makes a significant comfort difference.
Finally, luxury means the bathroom functions flawlessly. Leaky faucets, loose toilet seats, inconsistent water temperature, and poor water pressure all kill the experience. Before you invest in marble or rainfall showerheads, make sure the underlying plumbing and electrical systems can support the upgrades. In older homes, this might mean running a dedicated 20-amp circuit for heated floors or upgrading corroded supply lines.
Essential Elements of Luxury Guest Bathroom Design
High-End Fixtures and Hardware
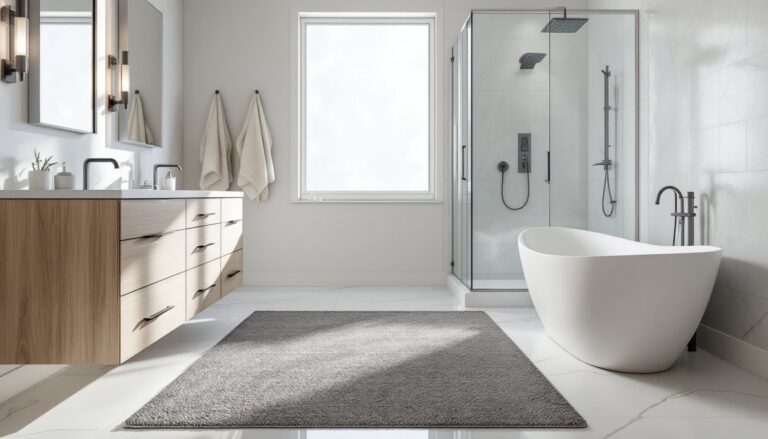
Fixtures are where guests literally interact with your bathroom, so quality matters. Widespread faucets with separate hot and cold handles feel more substantial than single-lever models, and they’re easier to operate with soapy hands. Look for solid brass or stainless steel construction with ceramic disc valves, they outlast compression or cartridge types and resist drips.
For the shower, consider a thermostatic valve rather than a pressure-balancing one. Thermostatic valves maintain exact temperature even when someone flushes a toilet elsewhere in the house, which is a detail guests notice. Pair it with a rain showerhead (10-12 inches diameter minimum) and a separate handheld wand on a slide bar.
Toilet selection often gets overlooked, but a comfort-height model (17-19 inches versus the standard 15 inches) with a soft-close seat and powerful flush (look for a Minimum Performance Standard rating of 350 grams or higher) makes a difference. Kohler, Toto, and American Standard all make reliable models in the $300–$600 range that balance performance and longevity.
Hardware finish matters more than most DIYers realize. Mixing metals can work if done intentionally, but for a cohesive luxury look, match all visible hardware, faucets, towel bars, cabinet pulls, light fixtures, in the same finish. Brushed nickel and matte black are both durable and hide water spots better than polished chrome.
Premium Materials and Finishes
Material selection in a luxury homes interior design approach means choosing surfaces that age gracefully and resist moisture damage. For flooring, porcelain tile in larger formats (12×24 inches or bigger) with rectified edges minimizes grout lines and gives a cleaner, more modern appearance. If you want the look of natural stone without the maintenance, porcelain can now mimic marble and limestone convincingly.
For walls, paint is fine if you use a satin or semi-gloss finish rated for bathrooms (Sherwin-Williams Emerald or Benjamin Moore Aura Bath & Spa both resist mildew well). But in the shower, tile or solid surface panels are non-negotiable. Large-format tiles (even up to 24×48 inches) reduce grout maintenance. If you’re tiling yourself, invest in a proper wet saw and level, lippage (uneven tile edges) ruins the look of even expensive tile.
Countertops should be non-porous. Quartz is nearly bulletproof and doesn’t require sealing. Natural marble looks stunning but needs annual sealing and will etch if guests spill acidic products. If you go with marble, choose a honed finish rather than polished, it hides etching better and is less slippery when wet.
For the vanity itself, solid wood construction with dovetail or dowel joinery will outlast particleboard boxes. If you’re on a tighter budget, a quality stock cabinet from a manufacturer like Kraftmaid or Wellborn can be dressed up with upgraded hardware and a custom countertop for a fraction of custom cabinetry costs.
Lighting deserves special attention. A single overhead fixture isn’t enough. Sconces flanking the mirror at roughly 60-65 inches off the floor (centered at face height) eliminate shadows and provide even task lighting. Use LED bulbs in the 2700-3000K range (warm white) with a CRI of 90 or above so skin tones look natural. Dimmer switches add flexibility, your guests may want bright light for shaving or subdued light for a late-night bathroom visit.
Creating a Spa-Like Experience for Your Guests
The spa experience is about sensory comfort and thoughtful details. Start with temperature control. Radiant floor heating is easier to install than most homeowners think, especially with electric mat systems that go under tile. They run about $10-$15 per square foot for materials and can be DIY-installed if you’re comfortable with basic electrical work (though you’ll want the final connection inspected). Set them on a programmable thermostat so the floor is warm when guests wake up.
Ventilation prevents the clammy feeling that undermines relaxation. If your current exhaust fan sounds like a helicopter, replace it with a quiet model rated under 1.0 sones. Panasonic WhisperCeiling and Broan Ultra Silent series both perform well. Size the fan to your room: you need at least 1 CFM per square foot, but 1.5 CFM is better for shower-heavy use. Vent it to the exterior, never into an attic.
Texture and textiles matter. Provide 600-thread-count or higher cotton towels, not the thin, scratchy ones from a big-box store. White or neutral colors let you bleach them between guests. Include both bath sheets (35×60 inches or larger) and hand towels. A heated towel rack is a nice touch, but even a wall-mounted bar keeps towels off the floor.
Storage should include a dedicated spot for guest toiletries. A floating shelf or small cabinet stocked with travel-size basics, shampoo, conditioner, body wash, lotion, saves guests from unpacking everything. Small design interventions that replicate boutique hotel amenities make a surprising impact.
Consider adding a handheld shower wand even if you have a rain head. Guests with different heights or mobility needs appreciate the flexibility, and it makes cleaning the shower easier for you. Install it on a slide bar so the height is adjustable.
Finally, incorporate a place to sit, either a built-in tiled bench in the shower (12-18 inches deep, 17-19 inches high) or a small teak stool. It’s a comfort feature for shaving legs or just standing less, and it elevates the space beyond purely functional.
Budget-Friendly Ways to Add Luxury Touches
You don’t need to tear out tile or replumb to add luxury. Start with paint. A fresh coat in a sophisticated neutral, Benjamin Moore’s Classic Gray or Sherwin-Williams’ Agreeable Gray, instantly updates the room. Use a quality paint: cheap stuff shows roller marks and requires extra coats.
Upgrade just the faucet and hardware. Swapping a builder-grade faucet for a mid-range widespread model ($150-$250) takes about 30 minutes with a basin wrench and immediately improves the visual and tactile experience. Similarly, replacing plastic towel bars and cabinet pulls with brushed nickel or matte black versions runs $50-$100 and makes a noticeable difference.
Mirrors amplify light and space. If you have a standard medicine cabinet, replace it with a large frameless mirror (at least 30×40 inches) or add a frame to the existing mirror using pre-cut trim pieces. For a custom look, apply trim molding (MDF primed pine works fine in bathrooms if painted) with construction adhesive and finish nails, then paint to match your trim.
Lighting upgrades deliver huge visual returns. Replace a single overhead dome light with a three-light vanity fixture above the mirror or flanking sconces. Make sure the electrical box is rated for the fixture weight. If you’re uncomfortable with electrical work, this is a reasonable task for a handyman, expect $100-$150 labor for a straightforward swap.
Accessories matter. A quality soap dispenser, tissue box cover, and wastebasket in matching finishes create cohesion. Skip the plastic: look for ceramic, stone, or metal options. Add a small vase with fresh or high-quality faux greenery, eucalyptus stems or a potted snake plant both tolerate bathroom humidity.
Finally, address the details. Caulk any gaps around the tub, shower, or vanity with a mildew-resistant silicone (GE Supreme Silicone or Loctite Polyseamseal both work well). Re-grout if existing grout is stained or cracked, it’s tedious but inexpensive. A grout refresh with a quality epoxy grout (Mapei Kerapoxy or Custom CEG-Lite) resists staining and lasts years longer than standard cement grout. Installing contemporary luxury homes interior elements doesn’t always require structural changes, sometimes it’s about refining what’s already there.
Conclusion
Transforming a guest bathroom into a luxury retreat doesn’t require unlimited funds or a full gut renovation. It requires attention to the details that affect daily use, solid fixtures, quality materials, thoughtful lighting, and a few comfort upgrades that show you’ve considered the guest experience. Focus on getting the fundamentals right first, then layer in the finishes and extras that fit your budget and skill level.